"Glossy Finish": Sanding and Polishing Resin Surfaces


"Glossy Finish": Sanding and polishing resin surfaces - your online video course
A well-kept secret ... More on that in a moment.
Anyone who creates art with resin wants a high gloss finish. And the epoxy resin delivers: resin is as glossy as 40 coats of varnish. Hard to believe, but it's true.
It is just as true that you can do even more! With sanding and polishing. This will make your resin surface shine even more. And make imperfections disappear from the surface.
For this online video course, artist Stefanie Etter has enlisted the help of a professional in the field of sanding and polishing: Norbert Mainka. Together, the two of them will show you how to achieve a "glossy finish".
Your content in the online video course "Glossy Finish"
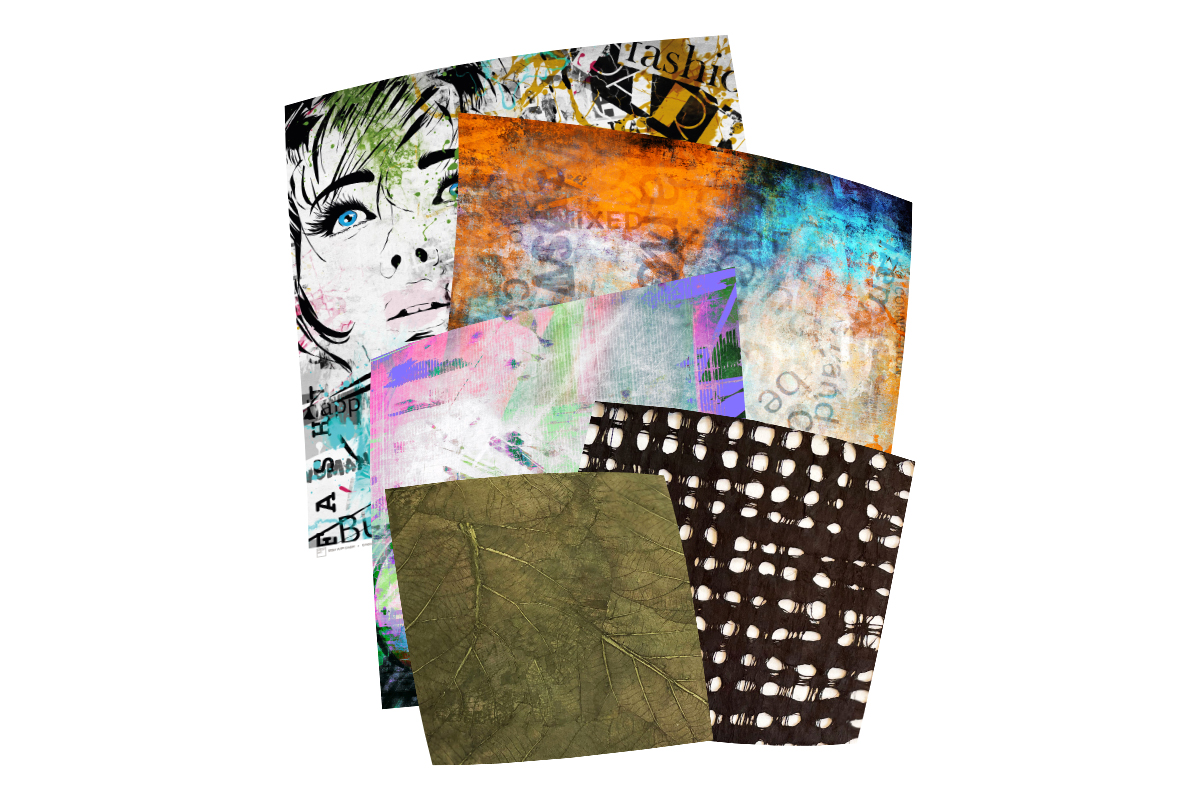
• 2 videos: Learn step by step from a professional how to remove imperfections from your resin surface. The example image in this video course is a mixed media artwork with "orange skin" in the resin.
• About half an hour of video material: Norbert explains and shows in detail how to achieve the best result. Stefanie asks him important questions in between - to which he provides equally important answers for you.
• 1 handout: In the handout you will learn more about the materials you need for your "Glossy Finish".
• Discount for the Etter Art Shop: You will receive a 10% discount on everything here in the shop in future.
• Sanding and polishing with a discount: With a code, you can shop at a permanent discount in Norbert Mainka's shop - you get a 10% discount from the professional for sanding and polishing.
How to sand and polish resin surfaces - the theory in your video course
Be honest: When are you actually finished with your resin artwork? When it has hardened? Yes, that's one possibility. The other: When you've got even more lustre out of your work.
Another question: What do you do if you notice flaws on your resin surface? Dispose of your work? You don't have to! What you can do instead: Sand and polish.
It's strange that this is not yet so widespread in the resin community - somehow hardly anyone talks about it. But good for you that you're here now. Because sanding and polishing brings out the best in any resin artwork. With or without flaws on the surface, sanding and polishing will always enhance your art.
This is what you get in the online video course "Glossy Finish" - the practice
Video 1: Sanding (video duration: approx. 20 minutes)
• Materials: We have prepared something special for you to make it as easy as possible.
• How to use the sander: settings and position.
• Choosing the right sandpaper and sanding discs: different sanding discs for different grits.
• Sanding: Which areas on your artwork can you sand? How exactly do you proceed, how often do you sand with the same grit, how much pressure do you work with? How and when are you finished sanding? And: Does sandpaper need to be cleaned?
• Extra tip: Learn how to tell you whether your sandpaper is still suitable for your resin surfaces.
After sanding, you will have a very smooth surface. Smoother than you could ever achieve after just pouring with resin. No more bubbles or dust. Fine scratches? All gone.
But: Your resin only has a silky matt shine. If you want to experience a radiant high gloss, you can polish now.
Video 2: Polishing (video duration: approx. 14 minutes)
• Choosing the right materials: polishing machine, polishing sponge and polishing paste.
• Polishing machine: How much speed and pressure you need for polishing. Plus: How to hold the machine correctly.
• Polishing paste: A specially developed paste for epoxy resin. How much paste to put on the sponge? The right amount so that none of it splashes around.
• Polishing: Areas that you should or should not polish. How to polish the surface at the edge of the picture. How to deal with the resulting heat. And how to recognise when you've finished polishing.
• Protect: How to seal the finished polished surface. We recommend you do this. Because the shiny resin surface on your artwork will tempt you to touch it again and again. Fingerprints? Simply wipe them off the resin with a cloth.
Are you still asking yourself a question or two about the topic? Stefanie does the same in the videos. She asks Norbert so that you no longer have any gaps (or dents, bubbles ...) in the resin surface. Instead, you have a mirror-smooth surface with an extremely high gloss. Your "glossy finish"!
Questions and answers about the online video course "Glossy Finish"
What is the content?
In this video course, you will learn how to sand and polish your resin surface. To eliminate flaws in the surface - and how to get even more resin gloss.
Where do I get the materials I need for sanding and polishing?
The course handout will tell you. We will tell you what you need and where you can get it.
Do I need previous experience with sanding or polishing?
You are welcome to bring this with you, but it is not necessary. The course will show you everything step by step. Even the things that might go wrong. You will then pay particular attention to these with the professional's guidance.
Do you have a money-back guarantee?
There is no money-back guarantee with our video self-study courses.
How long can I watch the course?
As long as the Etter Art Shop exists. And as often as you like.
Glossy Finish?
Of course!
If anything, resin can't shine enough. What do you think?
Login
July 13, 2024 09:51
Sehr hilfreiche & wertvolle Anleitung - mit Tipps, um ein Resinbild aufglänzen zu lassen
Ein wirkich sehr guter Kurs!!! Schritt für Schritt wird alles anschaulich und inhaltlich sehr gut erklärt, auch für Laien prima geeignet. Dieser kurs enthält sehr gute Tipps, wie man ein Resinbild auf Hochglanz polieren kann. Man kann sich das Viedeo jederzeit wieder anschauen, falls einem die einzelnen Arbeitsschritte nicht mehr präsent sein sollten. Ich kann diesen Kurs nur empfehlen! :-) Herzlichen Dank für den wirklich gelungenen Video-Krus!!! LG Nico
July 1, 2024 07:20
Resin Glanz habe ich hier neu entdeckt
Das ist genau das, was ich brauchte, um meine Kunst aus Resin zu verfeinern. Jeder Schritt wird detailliert erklärt und es hat mir sehr geholfen, Fehler in meinen Resinbildern zu korrigieren.
May 28, 2024 05:35
Viel gelernt!
Danke an Norbert und Stefanie für die vielen Fachinformationen und die ausführliche Anleitung.