Marmormehl von Etter Art: das feine Strukturmedium für deine Kunst
Fein. Faszinierend. Fielseitig. Wir meinen natürlich: vielseitig!
Warum es so wichtig ist, dass Marmormehl sehr fein ist? Weil du nur dann einen ausgezeichneten „Strukturteig“ für deine Kunst anmischen kannst. Ohne Sieben, ohne Klümpchen. Schnell und von Hand anzurühren.
Warum unser Marmormehl so faszinierend ist? Das musst du erleben. (Und wirst du!)
Fehlt noch: vielseitig. Genau wie du und deine Kunst. Denn die feinstoffliche Struktur erlaubt dir verschiedene Anwendungen – von Strukturpaste über Zeichenkreide bis Fresko.
Anwendungsmöglichkeiten Etter Art Marmormehl
Stelle unterschiedliche Strukturpasten oder Modelliermassen her (zum Beispiel mit Gips, Leim, Harz oder Binder)
Verdicke oder strecke Farbmittel (Marmormehl beispielsweise als Füllstoff nutzen)
Mattiere Farben, ohne sie dabei zu trüben
Kreiere Marmorgründe und Freskogründe
Verwende Marmormehl als Füllstoff für Epoxidharz
Helle Sichtbeton auf und veredle ihn
Mische Mal- und Zeichenkreide an (in Kombination mit Pigmenten, Bindemittel und Wasser)
Besonderheiten Marmormehl von Etter Art
Extra fein gemahlen (9 μm)
Strahlend weiß
Italienisches Marmormehl
Naturprodukt
Ohne Fremdstoffe oder Verunreinigungen
Wasserunempfindlich
Umweltfreundlich, ungiftig, biologisch unbedenklich
Hohe Deckkraft und Füllkraft
Je nach Einsatz unterschiedliche Effekte: samtweiche Oberfläche, Rissbildung, Strukturen einarbeiten
Anwendung Etter Art Marmormehl
Entdecke hier Stefanie Etters Lieblingsrezept für eine Strukturpaste mit Marmormehl. Es ist ein Klassiker für die künstlerische Anwendung!
Schritt 1: Du brauchst ungefähr zwei Teile Marmormehl und ein Teil Acrylbinder (Mischverhältnis nach Volumen).
Schritt 2: Gib zuerst das Marmormehl in einen Mischbecher. Es ist so fein vermahlen, dass du es vorab nicht sieben musst.
Schritt 3: Rühre dann den Acrylbinder ein. Langsam und sorgfältig, am besten mit einem Spatel. Achte darauf, dass du keine Acrylemulsion nimmst, sondern den Acrylbinder.
Schritt 4: Überprüfe die Konsistenz deiner Mischung: Fühlt sich die Textur wie ein zäher Rührteig an? Dann ist sie perfekt als Strukturmedium geeignet.
Ist sie zu fest oder zu flüssig, gibst du entweder etwas Acrylbinder oder etwas Marmormehl hinzu – und verrührst noch einmal.
Schritt 5: Trage deine Strukturpaste auf deinen Malgrund (oder eine andere Wunsch-Oberfläche) auf. Nutze dafür einen Spachtel.
Schritt 6: Während du die Paste aufträgst und auch danach: Arbeite die gewünschten Strukturen ein.
Schritt 7: Ein bisschen Geduld haben. Deine Strukturpaste trocknet ungefähr 24 Stunden lang – abhängig davon, wie dick du sie aufgetragen hast. Mit Wärme beschleunigst du den Vorgang. Nutze dafür gern die Sonne oder eine vorhandene Fußbodenheizung.
Eigene Strukturpaste für eigene Kunst. Du siehst: Mit dem Marmormehl von Etter Art geht das ganz leicht.
Eine feine Sache, oder?
New and Improved: Etter Art Premium Acrylic Emulsion!
Our latest Etter Art Premium Acrylic Emulsion offers a colourless, lightfast, and weather-resistant binder with versatile application possibilities for your artwork. Its standout feature is its enhanced adhesive strength, making it ideal for diluting with water in specific applications.
Applications of Acrylic Emulsion
The acrylic emulsion is perfect for:
• Mixing with resi-CRETE powder
• Creating acrylic paints using powder pigments
• Producing primers
• Preparing levelling compounds
• Fixing structures made from various materials, like lime putty
• Embedding materials such as mosaic tiles
Special features
• Colorless, even when mixed
• Lightfast
• High and improved adhesive strength
• Resistant to aging and weathering
• Variable viscosity and structure
• Suitable for working with resin
THE OPTIMAL LIME SWAT FOR ARTISTIC APPLICATIONS
That's him.
Pure white and very fine - that is what distinguishes the Etter Art swamp lime. And that is why it is particularly suitable for use in art. In general, the following applies to swamp lime: the older, the better the quality. This is because lime and water react slowly with each other - it takes some time for the crystal structures in the lime to become finer and finer. The Etter Art swamp lime was swamped (soaked) for 72 months. The result? Radiant white and a particularly fine structure. Ideal for artists.
Measuring, mixing and processing the Etter Art swamp lime
1.) Mix the Etter Art swamp lime in a ratio of 1:1 with marble flour powder until you get a homogeneous consistency reminiscent of cream quark. A hand mixer, for example, is suitable for mixing. In this case, the marble flour powder serves as a binder.
2.) If the mass is a bit too viscous, simply add a little of the water from the bucket with the lime putty (lime sinter water).
3.) Apply the resulting structure paste to the painting surface. The image idea is decisive for the type of application: Regular or irregular towering, flatter or higher, large areas or as accents.
4.) Then let the lime putty dry. The drying time depends on the layer thickness and the ambient temperature.
5.) During the drying time, fine cracks appear in the applied paste. The thinner the application, the more cracks appear. Conversely, a thicker application results in fewer cracks on an area of ??the same size.
6.) In order to fix the swamp lime structures on the painting ground, they must be secured after drying, for example with acrylic emulsion.
7.) After removing the lime putty from the bucket, top up with water if necessary so that there is always a layer of water covering the lime (lime sinter water). In this way, the product retains its properties and high Quality.
OUR ETTER ART XL CRACKLE PASTE FOR CRACLEES
That is her.
The Etter Art XL CRACKLE PASTE is a paste for creating unique cracks (crackle). Create exciting craquelure and give your artwork special depth and three-dimensionality.
The Etter Art XL CRACKLE PASTE consists of two components, primer and XL CRACKLE PASTE.
That's what she's for.
With the Etter Art XL CRACKLE PASTE you can create unique and exciting crackles that you can make in any size and density. It gives your artwork an incredible look and is particularly suitable for haptic and textural art. You can apply the XL CRACKLE PASTE up to 50 mm thick. The thicker or higher the layer, the deeper and wider its cracks.
Particularities.
With the help of the primer, making the craquelure is child’s play. In addition, the primer adheres excellently to materials such as canvas, wood, polystyrene, plastic, glass and much more. It is not suitable for materials that consist of silicone or contain Silicone.
Measuring, mixing and processing the XL CRACKLE PASTE
1.) You have prepared your painting surface beforehand, i.e. it has been dusted off, degreased and is lying flat on your work surface.
2.) Prime your painting ground. For your base layer, apply the primer 1-2 mm thin.
3.) Apply the XL CRACKLE PASTE directly to the base layer (primer). So you work wet on wet. This is important as this is the only way the dried XL CRACKLE PASTE will stick to the surface. Without binding using the primer, it dissolves again.
4.) Let the XL CRACKLE PASTE and the primer dry. Depending on the layer thickness of the paste, this takes several hours. The warmer, the shorter the drying time.
You should pay Attention to that.
• Best results at 18-25 °C.
• Do not store below 12 °C room temperature.
• Store dry.
• Protect from frost and heat.
• Close the container immediately after removing it.
• Clean the tool with water after use.
SINGLE PRODUCT: PRIMER
That is her.
The Etter Art XL CRACKLE PASTE is a paste for creating unique cracks (crackle). Create exciting craquelure and give your artwork special depth and three-dimensionality. The Etter Art XL CRACKLE PASTE consists of two components, primer and XL CRACKLE PASTE.
That's what she's for.
With the Etter Art XL CRACKLE PASTE you can create unique and exciting crackles that you can make in any size and density. It gives your artwork an incredible look and is particularly suitable for haptic and textural art. You can apply the XL CRACKLE PASTE up to 50 mm thick. The thicker or higher the layer, the deeper and wider its cracks.
Particularities.
With the help of the primer, making the craquelure is child’s play. In addition, the primer adheres excellently to materials such as canvas, wood, polystyrene, plastic, glass and much more. It is not suitable for materials that consist of silicone or contain silicone.
Measuring, mixing and processing the XL CRACKLE PASTE
1.) You have prepared your painting surface beforehand, i.e. it has been dusted off, degreased and is lying flat on your work surface.
2.) Prime your painting ground. For your base layer, apply the primer 1-2 mm thin.
3.) Apply the XL CRACKLE PASTE directly to the base layer (primer). So you work wet on wet. This is important as this is the only way the dried XL CRACKLE PASTE will stick to the surface. Without binding using the primer, it dissolves again.
4.) Let the XL CRACKLE PASTE and the primer dry. Depending on the layer thickness of the paste, this takes several hours. The warmer, the shorter the drying time.
You should pay attention to that.
• Best results at 18-25 °C.
• Do not store below 12 °C room temperature.
• Store dry.
• Protect from frost and heat.
• Close the container immediately after removing it.
• Clean the tool with water after use.
SINGLE PRODUCT: STRUCTURE PASTE
That is her.
The Etter Art XL CRACKLE PASTE is a paste for creating unique cracks (crackle). Create exciting craquelure and give your artwork special depth and three-dimensionality. The Etter Art XL CRACKLE PASTE consists of two components, primer and XL CRACKLE PASTE.
That's what she's for.
With the Etter Art XL CRACKLE PASTE you can create unique and exciting crackles that you can make in any size and density. It gives your artwork an incredible look and is particularly suitable for haptic and textural art. You can apply the XL CRACKLE PASTE up to 50 mm thick. The thicker or higher the layer, the deeper and wider its cracks.
Particularities.
With the help of the primer, making the craquelure is child’s play. In addition, the primer adheres excellently to materials such as canvas, wood, polystyrene, plastic, glass and much more. It is not suitable for materials that consist of silicone or contain silicone.
Measuring, mixing and processing the XL CRACKLE PASTE
1.) You have prepared your painting surface beforehand, i.e. it has been dusted off, degreased and is lying flat on your work surface.
2.) Prime your painting ground. For your base layer, apply the primer 1-2 mm thin.
3.) Apply the XL CRACKLE PASTE directly to the base layer (primer). So you work wet on wet. This is important as this is the only way the dried XL CRACKLE PASTE will stick to the surface. Without binding using the primer, it dissolves again.
4.) Let the XL CRACKLE PASTE and the primer dry. Depending on the layer thickness of the paste, this takes several hours. The warmer, the shorter the drying time.
You should pay attention to that.
• Best results at 18-25 °C.
• Do not store below 12 °C room temperature.
• Store dry.
• Protect from frost and heat.
• Close the container immediately after removing it.
• Clean the tool with water after use.
THE FACETTE VARNISH CRACKLING COLOR
That's him.
With the facet varnish Crackling Color you can create amazing special effects with coarser or finer cracks and a fantastic patina on almost any painting surface. Unforeseen creative possibilities arise in the areas of design and decoration.
He can.
The faceted varnish is very easy to use and gives your work of art an unusual reptile or faceted look with an antique character and Craquelure.
That's what it's for.
The Facetlack Crackling Color can be used almost anywhere. You can use it for design or decorative objects, but also for painting on pictures or collages.
Particularities.
The faceted varnish Crackling Color creates great effects in faceted optics, can be used on almost all surfaces and offers light fastness with simple application. In addition, the facet varnish Crackling Color offers an extraordinary crackling effect that cannot be produced in this form with any other material.
Measuring, mixing and processing the Crackling Color facet varnish
1.) You have prepared your painting surface beforehand, i.e. it has been dusted off, degreased and is lying flat on your work surface. Now apply the Crackling Color facet varnish to your painting surface with a brush or spatula.
2.) The layer thickness should be applied between 2-4 mm. The thicker the application of paint, the larger the facets.
3.) The drying time is 24-30 hours depending on the layer thickness.
4.) Please do not mix the paint with resin. After the hardening process, you can pour clear resin over the facet varnish. This is how you achieve a unique effect.
OUR RESI-BLAST, THE CELL AND STRUCTURE MEDIUM
That's it.
With resi-BLAST you can create unique cells, structures and color gradients on your artwork. The tension between resi-BLAST and resin creates incredible effects on your art.
It can.
Resi-BLAST can be used in many different ways. The advantage is that resi-BLAST does not connect to the resin, but displaces it. This allows you to create individual and unique cells, structures and color gradients that give your artwork something fascinating.
That's what it's for.
Resi-BLAST is specially designed for use with resin. Displacing the resin can create different cells depending on the amount. There are no limits to your imagination when it comes to Colours.
Particularities.
With resi-BLAST you can create special effects in your resin art. The effects appear immediately after the drops and you can follow the process of the cells live. In addition, the cells can be subsequently edited and changed. The effects are not only visible but can also be felt haptically.
Measuring, mixing and processing resi-BLAST
Mix with resin
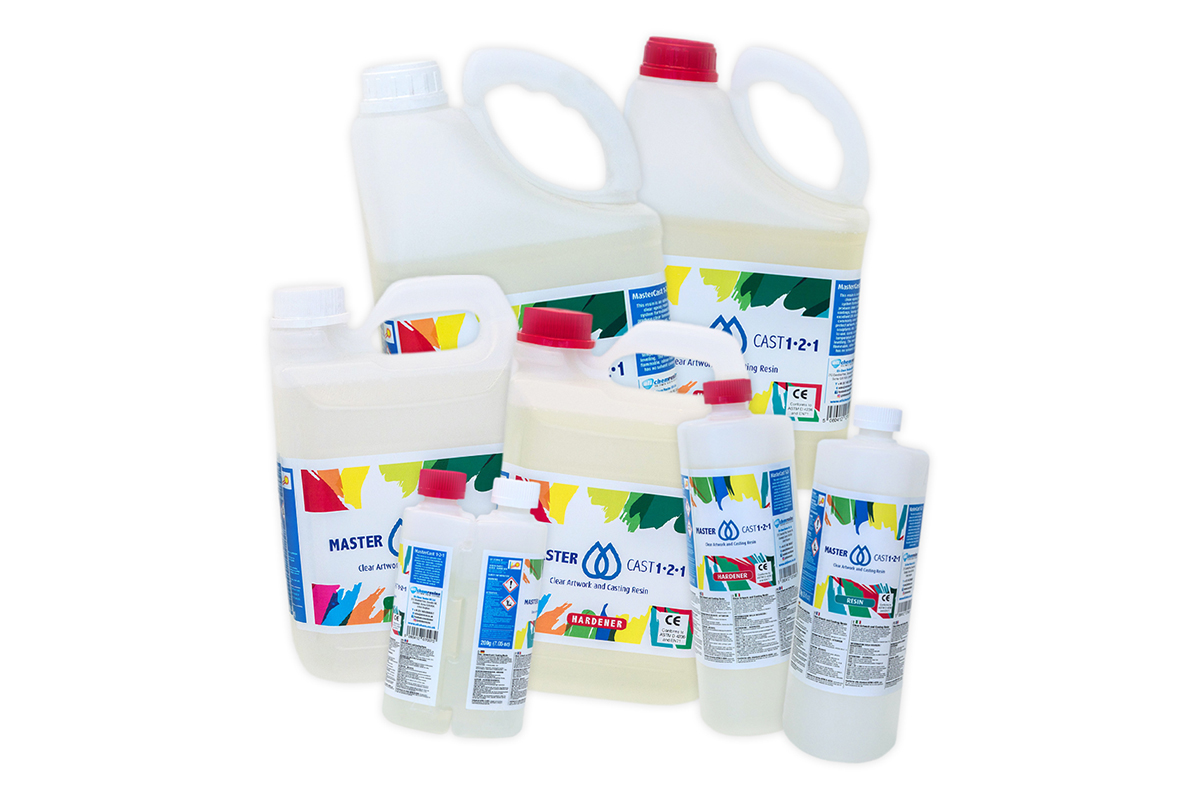
1.) Resin and hardener of MASTERCAST 1-2-1 are mixed by volume 1:1. Place the two components in a suitable mixing cup.
2.) Stir the measured amount in the mixing cup. Use a plastic spatula for this. Stir slowly and thoroughly for 3-5 minutes; also on the bottom and edges of the mixing cup.
3.) Your mix is ready and you now have 25-30 minutes to process the resin. Now you can color the resin and add resi-BLAST.
4.) After you have dropped the resi-BLAST into your color mixture, you will immediately see that something has changed in the mixing cup.
5.) You have prepared your painting surface beforehand, which means: it is dusted, degreased and lying flat on your work surface. Now pour the color mixture with resi-BLAST onto the painting surface.
6.) You can influence the resulting effects by blow-drying the cells with a heat gun. To do this, you have to try to enlarge or change the cells in circular movements over your cells.
Dripping on the artwork
1.) Resin and hardener of MASTERCAST 1-2-1 are mixed by volume 1:1. Place the two components in a suitable mixing cup.
2.) Stir the measured amount in the mixing cup. Use a plastic spatula for this. Stir slowly and thoroughly for 3-5 minutes; also on the bottom and edges of the mixing cup.
3.) Your mix is ready and you now have 25-30 minutes to process the resin. After that it becomes too thick and begins to harden.
4.) You have prepared your painting surface beforehand, which means: it has been dusted off, degreased and is lying flat on your work surface. Now pour your color mixture onto the painting ground.
5.) In order to achieve the most spectacular results possible, you should apply at least two different colors to your painting surface.
6.) Drop the resi-BLAST on one color only to create a monochrome effect. The point in time at which you apply the resi-BLAST is also important. The ideal time is about 5 minutes after casting, as the resin then offers the right consistency. The wrong time will cause an oily layer to form on your resin surface.
7.) You can influence the resulting effects by blow-drying the cells with a heat gun. To do this, you have to try to enlarge or change the cells in circular movements over your cells.
resi-CRETE: Struktur und Haptik für deine Kunst
resi-CRETE ist ein faszinierendes Medium mit dem du fantastische Strukturen auf deinem Kunstwerk erschaffen kannst. Es ist einfach, sicher und schnell anzuwenden und du kannst resi-CRETE auch mit anderen Produkten vermischen, um einzigartige Ergebnisse zu erreichen.
resi-CRETE ist ein vorpigmentiertes, zementartiges Pulver, welches sowohl mit Acrylemulsion als auch mit Resin angemischt werden kann. Mithilfe von resi-CRETE kannst du deinen Bildern ein strukturelles und haptisches Erlebnis erschaffen. Erzeuge mit resi-CRETE Oberflächen, die an Beton erinnern oder reliefartige Strukturen mit Rissen oder Furchen. Der Look hängt davon ab, wie du resi-CRETE anwendest und welche Materialien du ihm hinzufügst.
Anwendungsmöglichkeiten resi-CRETE
resi-CRETE ist eines der leichten Materialien, die du für Kunst mit Struktur und Haptik verwenden kannst. Das resi-CRETE deckt hervorragend und schnell auf Untergründen wie Holz, Glas, Stahl, Metall, Stein, Keramik und vielem mehr.
Besonderheiten des resi-CRETES
Durch seine Vorpigmentierung, ist resi-CRETE eines der einfachsten Medien zur Erzeugung von Strukturen. Es kann zusätzlich eingefärbt werden, in seiner Anwendung gibt es unterschiedliche Wege und eignet sich wunderbar für die Arbeit mit Resin.
Anwendung resi-CRETE
Für eine betonähnliche Oberfläche
Schritt 1: Gib das resi-CRETE-Pulver in einen geeigneten Mischbecher.
Schritt 2: Füge eine kleine Menge Acrylemulsion hinzu. Nutze dafür einen Kunststoffspatel. Rühre langsam und sorgfältig um; für 3-5 Minuten; auch am Boden und den Rändern des Mischbechers.
Schritt 3: Deine Mischung muss eine pastöse Konsistenz erreichen. Dafür kannst du, unter ständigem Rühren, weiter Acrylemulsion hinzufügen. Achte darauf, dass eine glatte Mischung ohne Klümpchen entsteht.
Schritt 4: Die richtige Konsistenz ist erreicht, wenn die Mischung von resi-CRETE und Acrylemulsion nicht mehr fließt.
Schritt 5: Je weniger Acrylemulsion du hinzufügst, desto fester wird deine Strukturpaste. So lässt sie sich dreidimensional Auftragen und Gestalten.
Schritt 6: Deine Mischung ist fertig und du hast jetzt 25-30 Minuten Zeit, um das resi-CRETE zu verarbeiten. Danach beginnt der Härteprozess.
Schritt 7: Deinen Malgrund hast du zuvor vorbereitet, das heißt: Er ist entstaubt, entfettet und liegt eben auf deiner Arbeitsfläche. Trage nun das Gemisch auf deinen Malgrund.
Für eine Reliefartige Oberfläche
Schritt 1: Gib das resi-CRETE-Pulver in einen geeigneten Mischbecher.
Schritt 2: Füge eine kleine Menge Acrylemulsion hinzu. Nutze dafür einen Kunststoffspatel. Rühre langsam und sorgfältig um; für 3-5 Minuten; auch am Boden und den Rändern des Mischbechers.
Schritt 3: Deine Mischung muss eine sehr feste Konsistenz erreichen. Achte darauf, dass eine feste Mischung ohne Klümpchen entsteht.
Schritt 4: Die richtige Konsistenz ist erreicht, wenn die Mischung von resi-CRETE und Acrylemulsion nicht mehr fließt und einen festen Zustand erreicht.
Schritt 5: Trage die Masse etwas dicker auf deinen Untergrund und erwärme sie kurz mit einem Föhn oder lasse dein Kunstwerk in der Sonne trocknen. Diese Vorgänge verstärken die Rissbildung.
Schritt 6: Deine Mischung ist fertig und du hast jetzt 25-30 Minuten Zeit, um das resi-CRETE zu verarbeiten. Danach beginnt der Härteprozess.
Schritt 7: Deinen Malgrund hast du zuvor vorbereitet, das heißt: Er ist entstaubt, entfettet und liegt eben auf deiner Arbeitsfläche. Trage nun das Gemisch auf deinen Malgrund.
Für Spachtelmasse auf Basis von Resin
Schritt 1: Harz und Härter von MASTERCAST 1-2-1 werden nach Volumen 1:1 vermischt. Gib die beiden Komponenten in einen geeigneten Mischbecher. (Es eignet sich auch TOTALCAST und ULTRACAST XT.)
Schritt 2: Füge resi-CRETE hinzu und rühre die abgemessene Menge im Mischbecher um. Nutze dafür einen Kunststoffspatel. Rühre langsam und sorgfältig um; für 3-5 Minuten; auch am Boden und den Rändern des Mischbechers.
Schritt 3: Das Mischverhältnis sollte 40 Gramm resi-CRETE auf 100 ml Resin betragen.
Schritt 4: Deine Mischung ist fertig und du hast jetzt 25-30 Minuten Zeit, um das resi-CRETE zu verarbeiten. Danach beginnt der Härteprozess.
Schritt 5: Deinen Malgrund hast du zuvor vorbereitet, das heißt: Er ist entstaubt, entfettet und liegt eben auf deiner Arbeitsfläche. Trage nun das Gemisch auf deinen Malgrund.
Darauf solltest du achten!
Trage immer Nitrilhandschuhe
Es ist ratsam, in einem gut belüfteten Raum zu arbeiten und eine Atemschutzmaske zu tragen
Hautkontakt vermeiden (wenn Harz auf die Haut gelangt, mit viel Wasser und Seife waschen)
Während der Arbeit NICHT essen, trinken oder rauchen
Bei Verunreinigungen der Augen 15 Minuten lang mit viel Wasser waschen und sofort einen Arzt aufsuchen
OUR RESI-CRETE FOR STRUCTURE AND HAPTIC
That's it.
resi-CRETE is a fascinating medium with which you can create fascinating structures on your artwork. It's easy, safe and quick to use, and you can also mix resi-CRETE with other products to achieve unique results.
It can.
resi-CRETE is a pre-pigmented, cement-like powder that can be mixed with both acrylic emulsion and resin. With the help of resi-CRETE you can create a structural and haptic experience for your pictures. Create surfaces with resi-CRETE that are reminiscent of concrete or relief-like structures with cracks or furrows. The look depends on how you apply resi-CRETE and what materials you add to it.
That's what it's for.
resi-CRETE is one of the lightweight materials you can use for art with texture and feel. The resi-CRETE provides excellent and quick coverage on surfaces such as wood, glass, steel, metal, stone, ceramics and much more.
Particularities.
Due to its pre-pigmentation, resi-CRETE is one of the easiest media to create structures. It can also be colored, there are different ways of using it and it is wonderfully suited for working with Resin.
Measuring, mixing and processing resi-CRETE
For a concrete-like surface
1.) Put the resi-CRETE powder in a suitable mixing cup.
2.) Add a small amount of acrylic emulsion. Use a plastic spatula for this. Stir slowly and carefully; for 3-5 minutes; also on the bottom and edges of the mixing cup.
3.) Your mixture must reach a pasty consistency. To do this, you can continue to add acrylic emulsion while stirring constantly. Make sure you get a smooth mixture with no lumps.
4.) The right consistency has been reached when the mixture of resi-CRETE and acrylic emulsion no longer flows.
5.) The less acrylic emulsion you add, the firmer your structure paste will be. It can be applied and designed three-dimensionally.
6.) Your mixture is ready and you now have 25-30 minutes to process the resi-CRETE. Then the hardening process begins.
7.) You have prepared your painting surface beforehand, which means: it has been dusted off, degreased and is lying flat on your work surface. Now apply the mixture to your painting Surface.
For a relief-like surface
1.) Put the resi-CRETE powder in a suitable mixing cup.
2.) Add a small amount of acrylic emulsion. Use a plastic spatula for this. Stir slowly and carefully; for 3-5 minutes; also on the bottom and edges of the mixing cup.
3.) Your mixture must reach a very firm consistency. Make sure you get a firm mixture with no lumps.
4.) The right consistency is reached when the mixture of resi-CRETE and acrylic emulsion stops flowing and has reached a solid state.
5.) Apply the mass a little thicker to your surface and briefly heat it up with a hair dryer or let your work of art dry in the sun. These processes increase cracking.
6.) Your mixture is ready and you now have 25-30 minutes to process the resi-CRETE. Then the hardening process begins.
7.) You have prepared your painting surface beforehand, which means: it has been dusted off, degreased and is lying flat on your work surface. Now apply the mixture to your painting Surface.
For putty based on resin
1.) Resin and hardener of MASTERCAST 1-2-1 are mixed by volume 1:1. Place the two components in a suitable mixing cup. (TOTALCAST and ULTRACAST XT are also suitable.)
2.) Add resi-CRETE and stir the measured amount in the mixing cup. Use a plastic spatula for this. Stir slowly and carefully; for 3-5 minutes; also on the bottom and edges of the mixing cup.
3.) The mixing ratio should be 40 grams of resi-CRETE to 100 ml of resin.
4.) Your mixture is ready and you now have 25-30 minutes to process the resi-CRETE. Then the hardening process begins.
5.) You have prepared your painting surface beforehand, which means: it is dusted, degreased and lying flat on your work surface. Now apply the mixture to your painting Surface.
You should pay attention to this when working with Resin.
• Always wear nitrile gloves.
• It is advisable to work in a well-ventilated area and to wear a respirator.
• Avoid skin contact (if resin gets on skin, wash with plenty of soap and water).
• DO NOT eat, drink or smoke while working.
• If eyes get dirty, wash with plenty of water for 15 minutes and seek medical attention immediately.
Die verschiedenen Resin-Produkte, sowie das ganze Zubehör rund um Resin sind mit Abstand die besten Produkte in Bezug auf Qualität und Preis-Leistung, die ich bisher gekauft habe. Das betrifft sowohl das Epoxidharz, als auch die verschiedenen Spachteln oder die Winkelpalette, die im Etter-Shop zu kaufen sind, oder die Farben zum Einfärben, oder das hitzebeständige Klebeband, oder oder ... . Es ist alles viel besser zu handhaben, als sonstige Produkte.
Stefanie Etter legt viel Wert auf gute Qualität und ich konnte mich davon überzeugen, dass Sie nur Artikel anbietet, von denen sie selbst zu 100% überzeugt ist. Das finde ich echt klasse! Deshalb empfehle ich auch meinen Schülern und Kursteilnehmern, die gerne mit Resin arbeiten und mich diesbezüglich fragen, immer den Shop und die Produkte von Stefanie Etter.
Die Lieferung kommt übrigens auch superschnell und der ganze Bestellservice funktioniert reibungslos. Hut ab!
Gaby Bolms-Grap
08-23-2025, 11:55:43 AM
Wer kann da widerstehen: künstlerisches Material in allen Formen und Farben. Von der Pigmentfarbe, über eine riesige Auswahl an Sprays und Strukturmaterialien bis hin zu den Schablonen in jeder Größe. Wer dort nicht auf seine Kosten kommt, um seine Projeke umzusetzen, ist selbst schuld. Das alleine ist es ja aber nicht. Stefanie Etter steht mit ihrer Expertise beratend zu Seite. ' Geht nicht gibt es nicht', sie probiert, mixt, verwirft und sucht nach Lösungen. Für mich war es eine sehr positive Erfahrung, man geht mit vielen neuen Inspirationen nach Hause.
Tanja Bär
08-01-2025, 03:07:40 PM
„Ich bin absolut begeistert! Die Schablonen sind von hervorragender Qualität, stabil, präzise geschnitten und in einer unglaublichen Vielfalt erhältlich, von großen A0–A3 Motiven bis hin zu feinen A4-Designs. Egal ob Muster, Städte, Formen oder Sprüche, alles lässt sich super verarbeiten und liefert perfekte Ergebnisse. Es gibt jetzt neu einen übersichtlichen Katalog, das vereinfacht ein bischen die Auswahl, aber eigentlich hätte ich sie gerne Alle.
Auch die Selbstlernkurse sind top: klar aufgebaut, verständlich erklärt und voller nützlicher Tipps, die man sofort anwenden kann. Insgesamt ein großartiges Angebot, das meine kreativen Projekte auf ein neues Level gebracht hat. Klare Empfehlung!
Und eines meiner Lieblingsprodukte, für alle reicht der Platz nicht:o) : Die Crackle Paste! Die Risseffekte sind einfach wunderschön und jedes Projekt bekommt damit eine besondere, authentische Struktur. Die Paste ist leicht aufzutragen, trocknet zuverlässig und die Ergebnisse sind jedes Mal beeindruckend. Für kreative Oberflächen absolut mein Favorit!“
An den Rändern zusätzlich Auftrag mit Marmormehl, auch das lies sich sehr einfach zu einer tollen Strukturpaste anmischen. Bin sehr zufrieden mit dem Ergebnis.
Tanja Meier
06-09-2025, 01:01:26 PM
Topp Qualität und super Service. Ich liebe euer Sortiment. Immer gerne wieder
Artist supplies and advice with HEART
Delivery within 2-3 working days
Delivery within 2-3 working days
Various payment options.
Available daily from 9 a.m. to 12 p.m. +49 (0) 174 - 6662350


Super zuverlässig und immer kundenorientiert.